All Your Games.
One Library.
Playnite brings your Steam, Epic, GOG, and emulator collections together in a single, beautiful game library you actually control.
What Is Playnite?
A unified game library manager that pulls your entire collection into one place
Your Games, One Interface
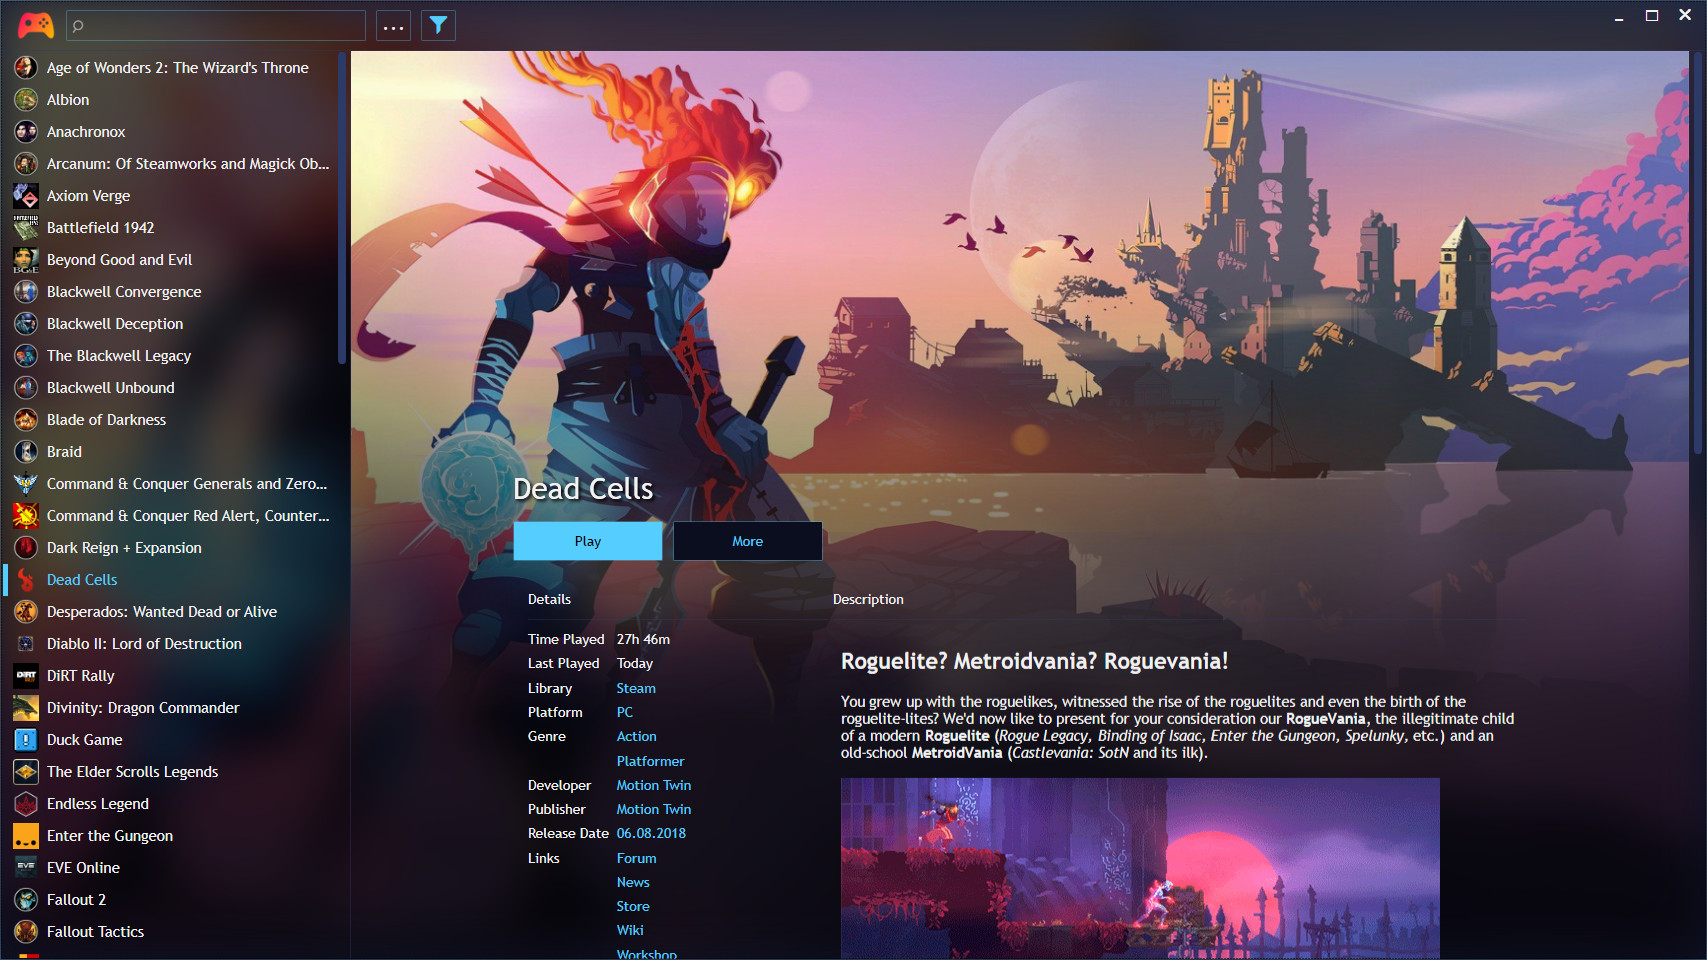
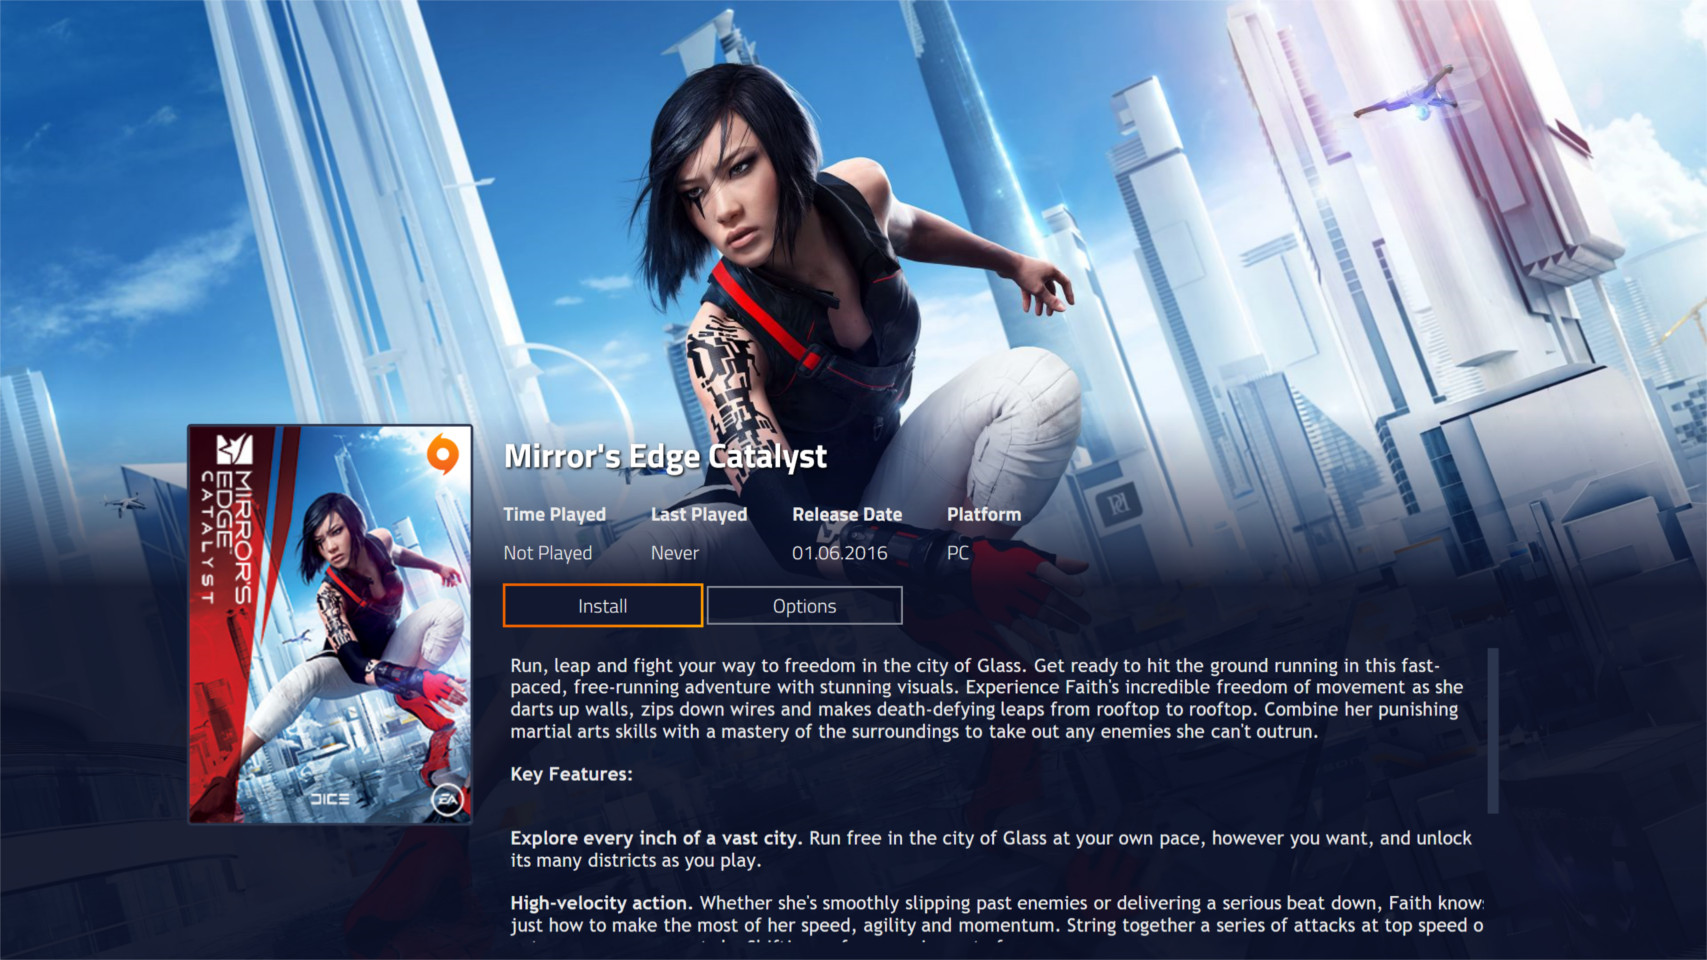
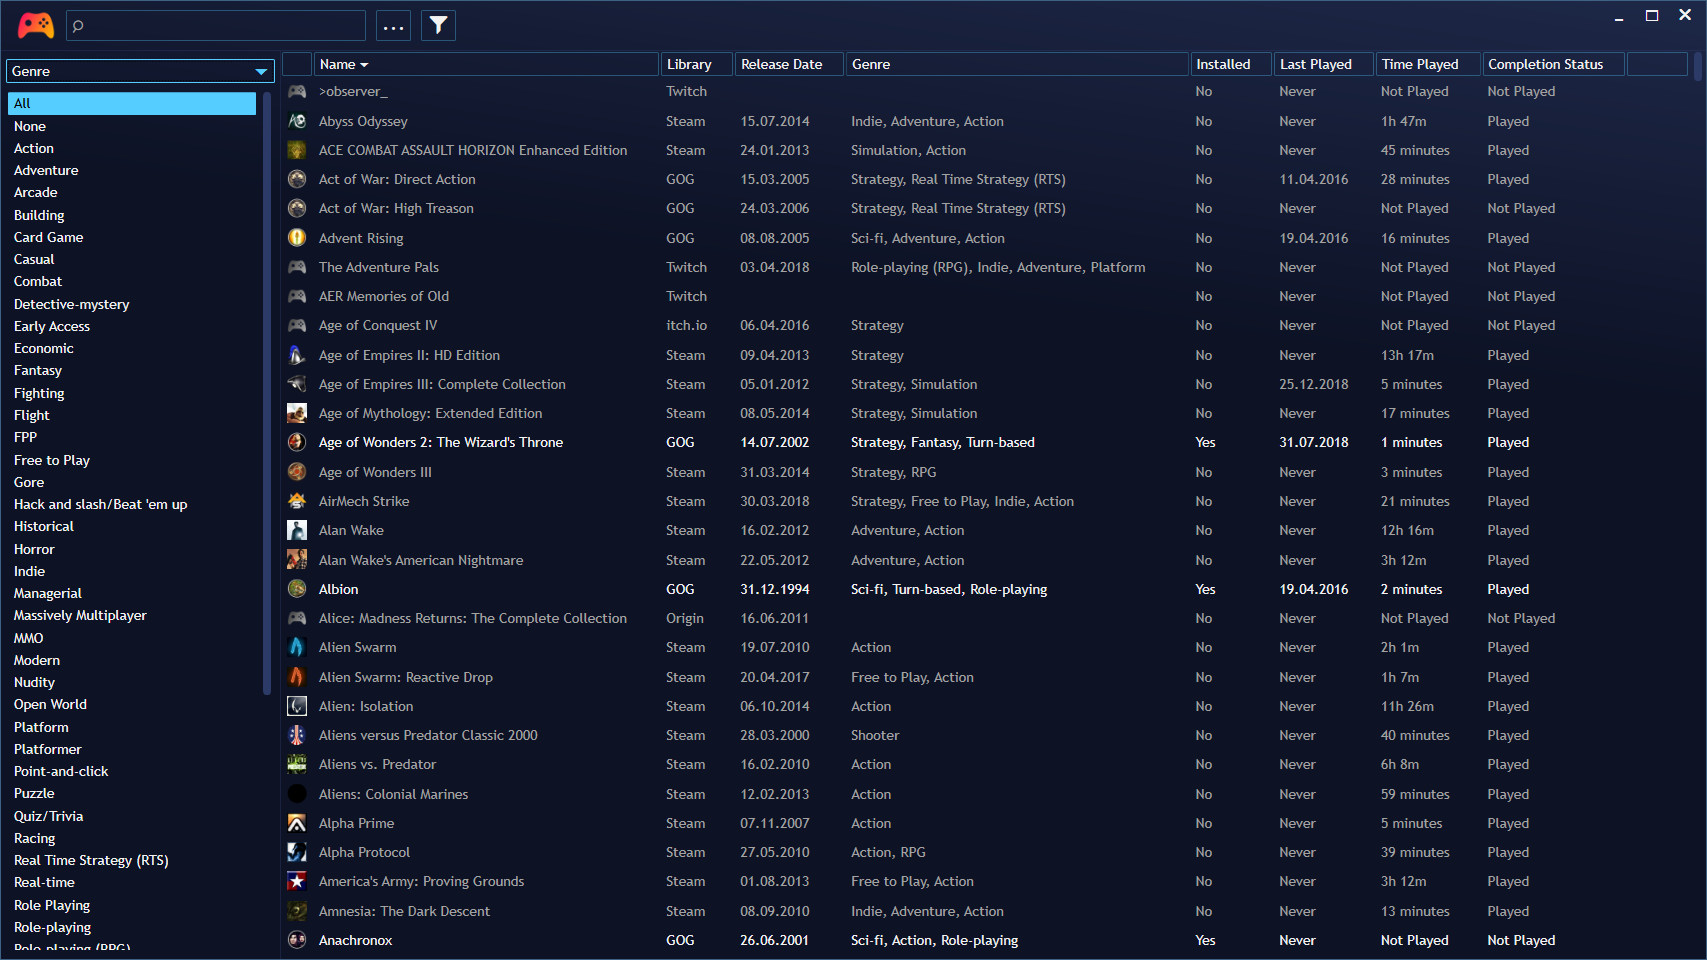
Playnite is a free, open-source game library manager built for Windows that consolidates games from Steam, Epic Games Store, GOG, EA App, Ubisoft Connect, Battle.net, Xbox PC, and more into a single browsable collection. Instead of switching between five or six different launchers to find what you want to play, Playnite gathers everything — including playtime stats, cover art, and metadata — under one roof.
Created and maintained by Josef Nemec, the project operates under the MIT license with full source code available on GitHub. There are no hidden costs, no telemetry, and no ads. All your data stays on your machine.
Built for Desktop and Couch
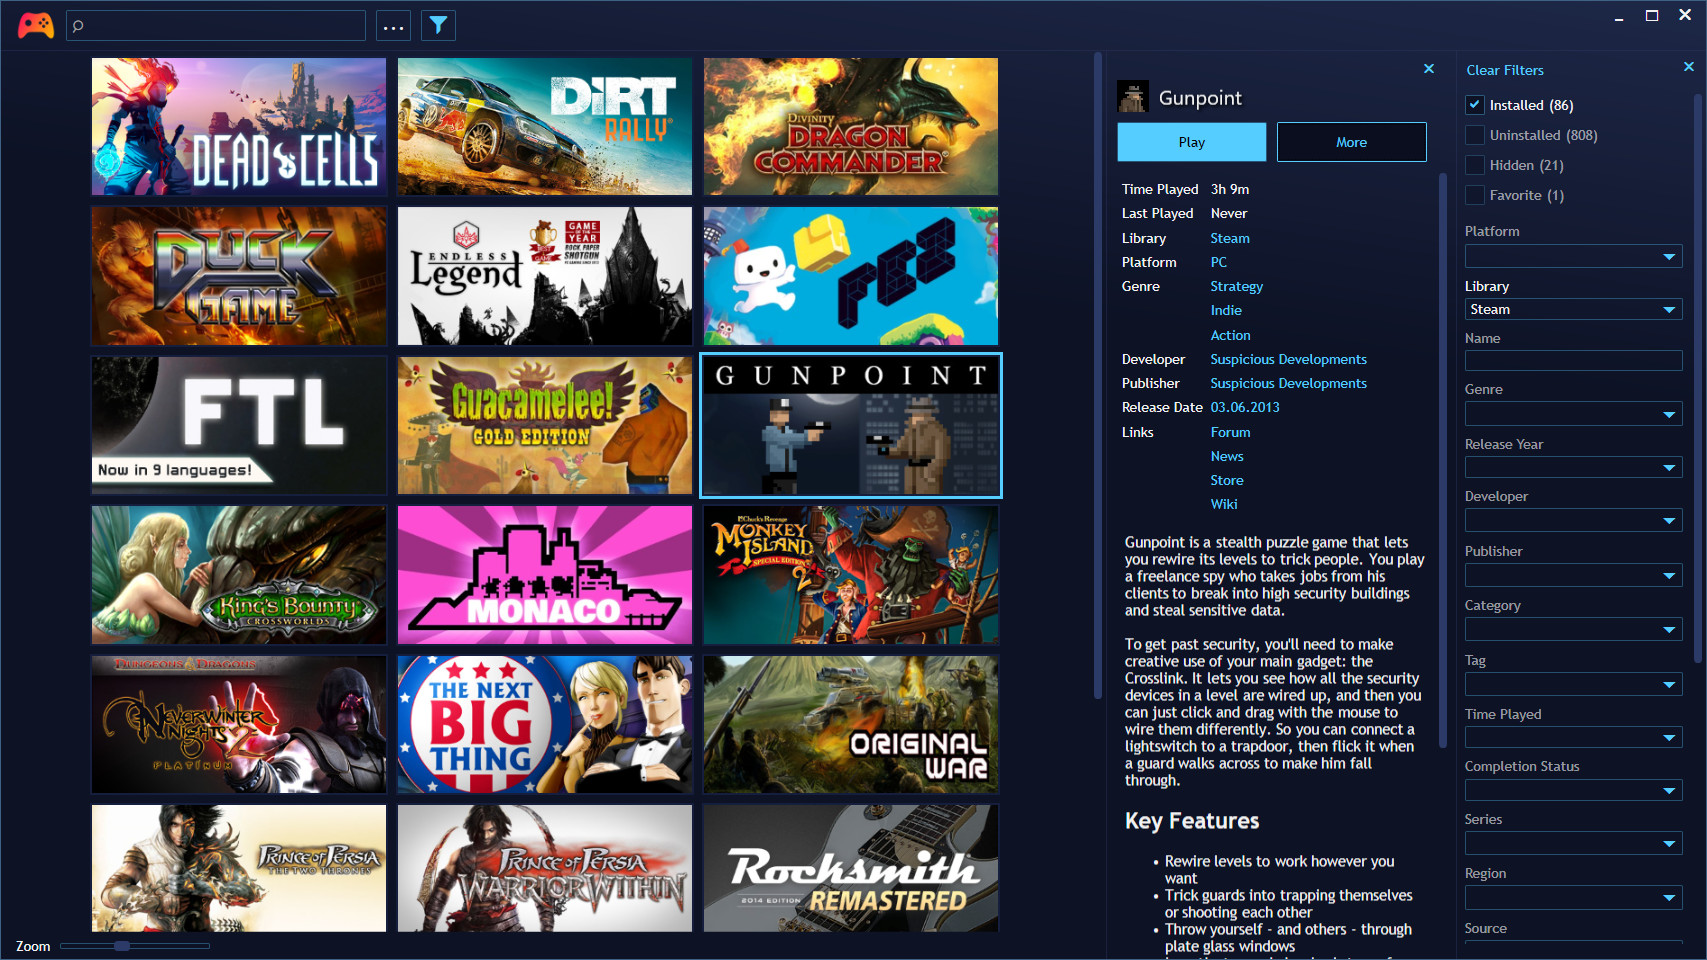
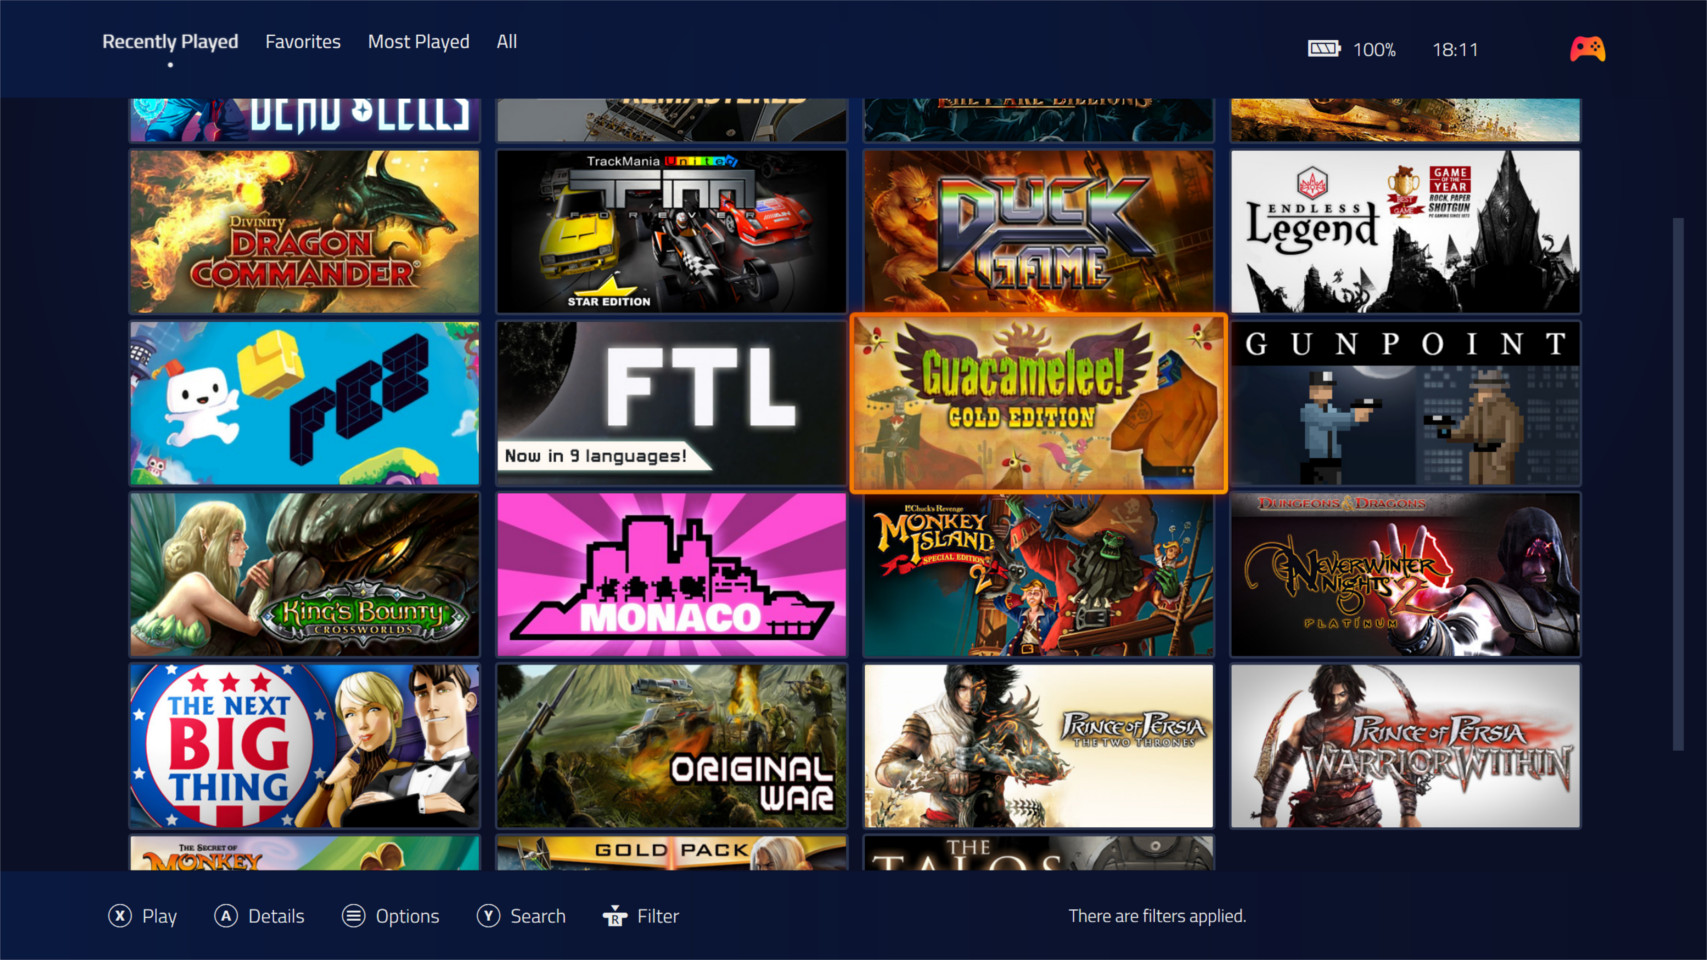
The desktop mode gives you a filterable grid or list view with a sidebar for sorting by platform, genre, completion status, or custom tags. A separate fullscreen mode turns Playnite into a controller-friendly interface similar to the old Steam Big Picture — perfect for gaming from the couch. Community themes can transform it into something that looks like a PS5 dashboard or an Xbox home screen.
Extend It Your Way
Playnite supports a growing plugin ecosystem. Extensions like SteamGridDB pull custom artwork, Extra Metadata adds trailers and logos, and Achievement Watcher tracks your progress across platforms. You can also configure emulators like RetroArch, Dolphin, and PCSX2 to manage your retro game collection alongside modern PC titles.
Unified Library
Import from 15+ launchers and storefronts. One search bar finds any game in your collection regardless of where you bought it.
Accurate Playtime Tracking
Tracks hours played for every game launched through the app, giving you a complete picture of your gaming habits across all platforms.
Deep Customization
Hundreds of community themes and extensions. Change the entire look and add features like achievement overlays, metadata scrapers, and more.
Privacy-First Design
Zero telemetry, zero ads, zero accounts required. Your library data is stored locally on your PC and never leaves your machine.
Ready to bring all your games together? Download Playnite or read the getting started guide.
Key Features
Playnite packs serious functionality into a lightweight package. Here is what makes it the go-to library manager for PC gamers.
Unified Game Library
Playnite pulls your entire collection from Steam, Epic Games Store, GOG, EA App, Battle.net, Ubisoft Connect, Xbox PC, Humble, itch.io, and Amazon Games into one place. Instead of jumping between six different launchers to find a game, you get a single searchable list. It also handles manually added games and portable installs, so nothing gets left out.
Built-In Emulation Support
Configure RetroArch, Dolphin, PCSX2, and other emulators directly inside Playnite. Point it at your ROM folders and it auto-scans, downloads cover art, and creates library entries that launch with one click. Your SNES collection sits right next to your Steam library, and the emulator setup wizard walks you through each platform step by step.
Automatic Metadata
Playnite fetches cover art, background images, descriptions, genres, and release dates from IGDB, Steam, and other sources. Your library looks polished without manual effort. Missing artwork? The SteamGridDB plugin fills the gaps.
Playtime Tracking
Every game launched through Playnite gets its hours logged automatically. It syncs with existing Steam playtime data and tracks sessions for non-Steam games that normally have zero tracking. You can finally see how many hours that GOG RPG actually consumed.
Fullscreen Mode
Switch to a controller-friendly couch mode that works like Steam Big Picture but covers your entire library. Navigate with a gamepad, browse by platform or genre, and launch any game without touching a keyboard. Community themes can make it look like a PS5 or Xbox dashboard.
Deep Theme Customization
Swap out the entire look with community themes like Helium, Solaris, or the popular PS5-style theme. Themes control everything from layout and grid size to animations and detail views. Building your own theme is possible too, with full XAML access.
Privacy-Focused
Playnite collects zero telemetry. No usage analytics, no ads, no account required, and no data leaves your machine. Your library database lives in a local SQLite file that you fully own and control. The MIT license means the code is auditable by anyone.
Plugin Ecosystem
Extend Playnite with community plugins: SteamGridDB for extra artwork, Extra Metadata Loader for logos and trailers, Achievement Watcher, HowLongToBeat integration, and Link Utilities for organizing game-related URLs. New plugins show up regularly on the add-ons browser.
Advanced Filtering
Filter your collection by platform, source, genre, completion status, tags, or custom categories you define. Combine multiple filters at once to build saved views like “Unfinished RPGs from GOG” or “Multiplayer games installed this month.” The left panel explorer keeps things fast even with thousands of entries.
Lightweight Install
The installer weighs about 50 MB and the running application uses minimal system resources. Playnite loads quickly even on older hardware, and a portable version is available if you prefer not to install anything. It runs on Windows 10 and 11 with .NET 4.6.2 or newer.
Fully Open Source
Released under the MIT license and maintained by Josef Nemec, Playnite is developed in the open on GitHub. Bugs get reported and fixed by the community. Anyone can audit the code, contribute features, or fork the project. Version 10.51 is the latest stable release.
Want to see Playnite in action? Check the screenshots or jump straight to the setup guide.
System Requirements
Hardware and software specs you need to run Playnite on your PC. Most modern Windows machines handle it without issues.
| Component | Minimum | Recommended |
|---|---|---|
| Operating System | Windows 10 (64-bit) | Windows 11 (64-bit) |
| Processor | Dual-core Intel or AMD | Quad-core Intel or AMD |
| RAM | 2 GB | 4 GB or more |
| Storage | 200 MB free space | 500 MB (for large game libraries) |
| Display | 1280 x 720 (HD) | 1920 x 1080 (Full HD) |
| Network | Internet for metadata sync | Broadband connection |
| Runtime | .NET Framework 4.6.2 | .NET Framework 4.8 |
Ready to get started? Download Playnite and set up your unified game library.
Download Playnite
Get the latest version of Playnite and start organizing your game library in minutes.
Playnite is free and open-source software released under the MIT license. Both the installer and portable versions are available from the official GitHub repository. A native Linux version is in development and expected sometime in 2026.
Screenshots
See how Playnite organizes your entire game collection across desktop and fullscreen modes.
Want to try it yourself? Download Playnite and start organizing your game library.
Getting Started with Playnite
From first download to a fully organized game library in about ten minutes. Here is everything you need to know.
Head over to our download section to grab the latest version of Playnite (currently v10.51, roughly 50 MB). You have two options to pick from: the standard Windows installer (.exe) or a portable ZIP version.
The installer is the recommended choice for most people. It handles everything automatically: creates a Start Menu shortcut, sets up file associations, and makes updating easier down the road. If you prefer something lighter, the portable version runs directly from any folder without touching your system registry. That makes it handy for USB drives or situations where you want zero footprint on the host machine.
Both versions require Windows 10 or 11 (64-bit) with .NET Framework 4.6.2 or newer already installed. Most modern Windows machines ship with this by default, so you likely won’t need to install anything extra.
After downloading the installer, double-click the .exe file to begin. If Windows SmartScreen shows a warning (common with open-source software), click “More info” and then “Run anyway” — the file is safe and signed from the official GitHub release.
Installer Steps
- Accept the license agreement (MIT license — fully permissive).
- Choose the installation directory. The default path
C:\Users\[You]\AppData\Local\Playniteworks well for most setups. - Optionally check “Create desktop shortcut” if you want quick access from your desktop.
- Click Install and wait about 15-20 seconds for the files to extract.
- Once finished, leave “Launch Playnite” checked and click Finish.
Portable Setup
If you chose the ZIP version, extract it to any folder you like (for example, D:\Games\Playnite). Then run Playnite.DesktopApp.exe to start. No installation process is needed — it runs immediately.
C:\Program Files — Windows permission restrictions can prevent Playnite from writing its database files there.
When Playnite launches for the first time, a setup wizard walks you through connecting your game libraries. This is where the real value kicks in.
First-Run Wizard
- Welcome screen: Select your preferred language and theme (Desktop or Fullscreen mode). Pick Desktop mode for keyboard and mouse use; pick Fullscreen if you are connecting to a TV with a controller.
- Library integration: Toggle on each game service you use — Steam, Epic Games Store, GOG Galaxy, EA App, Battle.net, Ubisoft Connect, Xbox, and others. Playnite connects through official APIs and browser-style authentication tokens.
- Authentication: For each toggled service, you will be prompted to sign in through a built-in browser window. Your login credentials stay local — Playnite stores only the session token on your machine.
- Metadata download: After authenticating, Playnite imports your libraries and pulls cover art, background images, and game metadata automatically. This can take a few minutes for large collections (500+ games).
Recommended Settings to Change
After finishing the wizard, open Settings (gear icon in the top bar or press F4) and adjust these:
- General > Start in Fullscreen mode: Enable this if you primarily game on a TV.
- General > Launch on Windows startup: Useful if Playnite is your main game launcher.
- Appearance > Grid item spacing: Reduce this if you want more games visible on screen at once.
- Updates > Check for addon updates: Turn on to keep your plugins and themes current.
With your libraries imported, you are looking at your unified game collection. Here is how to make the most of it.
Browsing and Filtering
The left panel (called the Explorer panel) lets you filter games by source (Steam, Epic, GOG), platform, genre, completion status, and more. Click any filter to instantly narrow down your view. You can toggle the Explorer panel on or off from View > Explorer Panel or by pressing Ctrl+E.
Adding Games Manually
For games that did not import automatically (DRM-free titles, indie downloads, or older games), click the “+” button in the top toolbar, then choose “Add Game Manually”. Point Playnite to the game’s executable, give it a name, and click Save. Playnite will try to match metadata from IGDB automatically.
Setting Up Emulators
To add emulated games, go to Library > Configure Emulators. Click “Import” to auto-detect installed emulators like RetroArch, Dolphin, or PCSX2. Then use “Scan Folder” under Library > Configure Emulators > Auto-Scan to point at your ROM directories. Playnite adds each ROM as a separate game entry with proper platform tagging.
Useful Keyboard Shortcuts
- F11: Toggle between Desktop and Fullscreen mode
- Ctrl+F: Quick search across your entire library
- F5: Refresh library and re-download metadata
- Ctrl+E: Toggle Explorer panel
A handful of small adjustments can make Playnite significantly more polished after the initial setup.
Install the Must-Have Extensions
Open the add-on browser from the menu bar (Add-ons > Browse) and search for these community favorites:
- SteamGridDB: Pulls high-quality cover art, banners, and icons for every game — especially helpful for emulated titles that lack default artwork.
- Duplicate Hider: If you own a game on multiple platforms, this plugin consolidates them into a single entry to keep your library clean.
- HowLongToBeat: Shows estimated completion time directly on each game’s detail page.
- Success Story: Tracks achievements across all platforms in one place.
Performance and Startup
Playnite is lightweight even with thousands of games, but if you notice slower load times, go to Settings > Performance and enable “Asynchronous image loading”. This loads cover art on demand rather than all at once.
Where to Get Help
The official documentation lives at playnite.link/docs. For community support, check out r/playnite on Reddit or the Playnite Discord server, both of which have active and helpful communities. Feature requests and bug reports go on the GitHub issues page.
Ready to get started? Download Playnite and have your game library organized in minutes.
Frequently Asked Questions
Answers to the most common questions about downloading, installing, and using Playnite on your PC.
Is Playnite safe to download and install?
Yes, Playnite is safe to download and install. The entire codebase is open source under the MIT license, hosted publicly on GitHub where anyone can inspect every line of code. The official installer from playnite.link consistently passes VirusTotal scans with 0 out of 70+ engine detections.
Playnite stores all data locally on your PC in %appdata%\Playnite (standard install) or the program folder (portable). It collects zero telemetry, sends no usage data, and runs no background services when closed. The application connects to the internet only when you import library metadata from services like Steam or GOG, and those connections go directly to each platform’s official API.
- Source code publicly auditable at
github.com/JosefNemec/Playnite - No bundled adware, toolbars, or cryptocurrency miners in the installer
- Windows SmartScreen may flag it because the installer lacks an EV code-signing certificate — click “More info” then “Run anyway” to proceed
- Occasional antivirus false positives (reported with Malwarebytes, Bitdefender) stem from Playnite’s process-monitoring behavior for playtime tracking
Pro tip: Always download from playnite.link or the GitHub releases page. Third-party download sites sometimes repackage the installer with bundled software that triggers real malware warnings.
For version and file details, check our download section.
Where is the official safe download for Playnite?
The only two official download sources for Playnite are the website at playnite.link and the GitHub releases page at github.com/JosefNemec/Playnite/releases. Both host identical installer files built directly from the open-source repository.
The current release is version 10.51, released on February 20, 2026. The installer file (PlayniteInstaller.exe) weighs roughly 50 MB and requires about 200 MB of disk space after installation. Third-party sites like Softpedia or LO4D may host mirrors, but these are not maintained by the developer Josef Nemec. Some repackaged versions have been reported with bundled adware or modified executables.
- Official site: playnite.link (main download button on the homepage)
- GitHub: check the “Assets” dropdown under the latest release for both installer and portable ZIP
- Verify file integrity by comparing the SHA-256 hash listed on the GitHub release page
Pro tip: Bookmark the GitHub releases page directly. You can subscribe to release notifications by clicking “Watch” on the repository and selecting “Releases only” to get email alerts for every new version.
You can also grab the latest version from our download section on this page.
Is Playnite free from malware and spyware?
Yes, Playnite is completely free from malware and spyware. As an open-source project with the full source code published on GitHub, any malicious code would be immediately spotted by the developer community. The r/playnite subreddit (over 30,000 members) regularly discusses security, and no verified malware incidents have ever been linked to official Playnite releases.
Playnite does not run any background processes after you close it. It has no advertising framework, no analytics SDK, and no account system that could leak your credentials. Your Steam, Epic, and GOG login tokens are handled by each platform’s own authentication flow, not stored by Playnite itself. Library metadata (game names, cover art, playtime) is cached locally in a LiteDB database within your Playnite data folder.
- No network calls to third-party tracking or ad servers
- Plugins are community-developed but reviewed on the official addon database
- If a third-party plugin triggers a security warning, disable it via Main menu > Add-ons > Installed
Pro tip: If your antivirus flags Playnite, add an exclusion for the install folder rather than disabling your AV entirely. Report false positives to your AV vendor with the VirusTotal clean scan as evidence.
See our features overview for more on Playnite’s privacy-first architecture.
Does Playnite work on Windows 11?
Yes, Playnite works perfectly on Windows 11. Version 10.51 (the latest release as of February 2026) is fully tested and compatible with Windows 11 23H2 and 24H2, including the latest cumulative updates. There are no known compatibility issues with Windows 11’s new features like Snap Layouts or the redesigned taskbar.
Playnite requires .NET Framework 4.6.2 or later, which ships pre-installed on every Windows 11 build. The recommended runtime is .NET 4.8, also included by default. On Windows 11, Playnite runs on both Intel and AMD 64-bit processors. ARM-based Windows 11 devices (like Surface Pro X) can run Playnite through x64 emulation, though performance may be slightly reduced during large library imports.
- Minimum: Windows 10 64-bit, dual-core CPU, 2 GB RAM, 200 MB storage
- Recommended: Windows 11 64-bit, quad-core CPU, 4 GB RAM, 500 MB storage
- Windows 7 and 8 support was dropped after version 10.20
Pro tip: One reported issue on Windows 11 24H2 involves HDR auto-activating when launching games through Playnite. Fix this by disabling HDR in Playnite’s per-game settings or updating your GPU drivers to the latest version.
Full hardware specs are listed in our system requirements section.
Is Playnite available for macOS or Linux?
Playnite is currently Windows-only. There is no native macOS version and none is planned. However, a Linux port is actively in development and expected to arrive during 2026 as part of Playnite 11, which transitions the UI framework from WPF to Avalonia.
The current Windows-only limitation exists because Playnite was built on Windows Presentation Foundation (WPF), a framework that only runs on Windows. Developer Josef Nemec announced in late 2025 that Playnite 11 will use Avalonia UI, a cross-platform .NET framework, specifically to enable Linux support. The Linux version will include Wine and Proton integration for launching Windows games, GameMode/MangoHud support, and native Flatpak packaging.
- Linux port: planned for 2026 via Avalonia UI rewrite (Playnite 11)
- macOS: not on the current roadmap
- Running Playnite on Linux today via Wine or Bottles is possible but unofficial and unstable
- For Linux alternatives now, consider Heroic Games Launcher or Lutris
Pro tip: Follow the Playnite GitHub repository and the r/playnite subreddit for Linux development updates. Josef posts progress notes on the Avalonia migration in GitHub discussions.
Check our system requirements for current Windows compatibility details.
What are the minimum system requirements for Playnite?
Playnite requires Windows 10 or 11 (64-bit), a dual-core processor, 2 GB of RAM, and 200 MB of free disk space at minimum. These are modest requirements that most modern PCs exceed without issue.
The application itself is lightweight. The installed size sits around 200 MB, growing to roughly 500 MB if you have a large library with thousands of games and cached cover art. RAM usage typically stays between 150-400 MB depending on how many library plugins you run and whether you use high-resolution background images. Playnite needs .NET Framework 4.6.2 at minimum, though .NET 4.8 is recommended for best performance and stability.
- OS: Windows 10 (64-bit) minimum, Windows 11 recommended
- CPU: Dual-core Intel or AMD, quad-core recommended
- RAM: 2 GB minimum, 4 GB recommended for libraries over 500 games
- Storage: 200 MB minimum, 500 MB for large libraries with cached artwork
- Network: Internet connection needed for metadata downloads and library syncing
- Runtime: .NET Framework 4.6.2+ (4.8 recommended)
Pro tip: If Playnite feels sluggish on an HDD, move it to an SSD. Library loading and metadata fetching become noticeably faster. The portable version makes this easy — just copy the folder.
See the full spec breakdown in our system requirements table.
Is Playnite completely free to download and use?
Yes, Playnite is 100% free. There is no paid tier, no premium version, no subscription, and no feature gating. Every capability — fullscreen mode, plugin support, custom themes, playtime tracking, emulator integration — is available to all users at no cost.
Playnite is released under the MIT license, one of the most permissive open-source licenses. This means you can download, modify, redistribute, and even use the code commercially without restriction. The project is funded entirely through voluntary donations on Patreon and Ko-fi. Developer Josef Nemec maintains the project as a passion project, and community contributions on GitHub help extend its features through plugins and themes.
- No ads, no pop-ups, no “upgrade to Pro” prompts
- All 44+ library integration plugins are free
- Community themes (PS5-style, Helium, Solaris, and hundreds more) are free from the addon browser
- Support the project: Patreon donations start at $1/month
Pro tip: Unlike LaunchBox, which locks its BigBox fullscreen mode behind a $30+ license, Playnite’s fullscreen controller mode is free out of the box. This makes it a strong pick for HTPC and Steam Deck setups.
Explore everything included for free in our features section.
What license does Playnite use?
Playnite uses the MIT license, which is a short, permissive open-source license. It allows you to use, copy, modify, merge, publish, distribute, sublicense, and sell the software without any restrictions beyond retaining the copyright notice.
In practical terms, this means Playnite will never become paid software or switch to a restrictive model. The codebase on GitHub (github.com/JosefNemec/Playnite) has over 9,000 stars and 400+ forks, making it one of the most actively developed open-source gaming tools available. Plugins and themes developed by the community often use the same MIT license, though some addon developers choose their own terms.
- MIT license: free for personal and commercial use
- No CLA (Contributor License Agreement) required for contributions
- Plugins can use any license, but most follow MIT
- Your library data, configurations, and saves belong entirely to you
Pro tip: Since Playnite is MIT-licensed, you can fork the repository and build your own customized version if you want features the main project doesn’t support. Several community forks exist for niche use cases like kiosk mode setups.
Learn about all the features this license gives you access to in our features overview.
How do I download and install Playnite step by step?
Download the installer from the official website at playnite.link, then run PlayniteInstaller.exe and follow the setup wizard. The entire process takes under two minutes on most connections.
The installer is around 50 MB and drops to about 200 MB once installed. During setup, you choose between Standard and Portable installation modes. Standard installs to %LocalAppData%\Playnite and creates Start Menu shortcuts. Portable puts everything in a single folder you can move freely. Both modes are functionally identical.
- Go to our download section and click the download button
- Run
PlayniteInstaller.exe— if Windows SmartScreen appears, click “More info” then “Run anyway” - Choose your installation type: Standard (recommended for most users) or Portable
- Select your install location and click Install
- Launch Playnite from the desktop shortcut or Start Menu
- On first launch, connect your game libraries (Steam, Epic, GOG, etc.) through the setup wizard
Pro tip: Pick the portable install if you plan to use Playnite on multiple PCs or a USB drive. Your library database, settings, and themes all travel with the program folder.
For a detailed walkthrough with configuration tips, read our getting started guide.
Playnite portable vs installer – which version should I choose?
Choose the standard installer if you want automatic updates and Start Menu integration. Choose portable if you want to run Playnite from a USB drive, keep it on a separate partition, or use it across multiple machines.
Both versions run the exact same Playnite 10.51 application with identical features. The difference is where your data lives. The standard installer puts the program in %LocalAppData%\Playnite and user data in %AppData%\Playnite. The portable version stores everything inside one folder. Standard install receives automatic update notifications through the built-in updater. Portable users need to check for updates manually or enable the update check in Settings > General.
- Standard installer: best for a single PC, auto-updates, adds uninstall entry in Windows Settings
- Portable: best for USB drives, HTPC builds, Steam Deck (Windows), or if you prefer not touching the Windows registry
- Both: same ~200 MB installed size, same plugin/theme support, same fullscreen mode
- You can convert between modes by copying the data folder contents
Pro tip: Many Steam Deck (Windows) and ROG Ally users prefer the portable version installed on a microSD card. This keeps your game library database separate from the OS partition and survives system resets.
Start with either version using our getting started guide.
How to fix Playnite installation errors on Windows?
Most Playnite installation errors come from missing .NET Framework components, corrupted downloads, or antivirus interference. Fixing these takes a few minutes at most.
The installer requires .NET Framework 4.6.2 or later. Windows 10 and 11 ship with .NET 4.8 by default, but older Windows 10 builds (pre-1803) may need a manual update from Microsoft’s download center. If the installer crashes immediately or shows a “CLR error,” your .NET installation is likely corrupted. A less common issue is antivirus software quarantining the installer before it finishes — Bitdefender and Kaspersky have both been reported to do this.
- Re-download the installer from playnite.link — a partial download causes checksum mismatches
- Right-click the installer, select Properties, and check “Unblock” at the bottom if present
- Temporarily disable real-time antivirus scanning during installation
- If you see a .NET error, run
sfc /scannowin an elevated Command Prompt, then reinstall .NET 4.8 from Microsoft - Try running the installer as Administrator (right-click > Run as administrator)
Pro tip: If the standard installer consistently fails, download the portable ZIP from the GitHub releases page instead. Extract it anywhere and run Playnite.DesktopApp.exe directly — no installation needed.
For a complete setup walkthrough, see our getting started guide.
How to fix Playnite not opening, crashing, or freezing?
If Playnite crashes at startup or freezes during use, the most common cause is a faulty extension or theme. Start by launching in Safe Mode to isolate the problem.
Safe Mode disables all extensions, custom themes, and third-party scripts. To access it, launch Playnite with the --safestartup command-line argument, or go to Main menu > Help > Restart in Safe Mode if you can still reach the menu. If Playnite works fine in Safe Mode, one of your installed extensions is the culprit. Community reports from r/playnite frequently point to plugins like Success Story, HowLongToBeat, and older versions of Extra Metadata as sources of startup crashes, especially after Playnite updates.
- Try Safe Mode first: add
--safestartupto the shortcut target or use Help > Restart in Safe Mode - If Safe Mode works, disable extensions one by one in Add-ons > Installed until you find the problem plugin
- Delete the
ExtensionsDatafolder in your Playnite data directory to reset plugin caches - Check for overlay conflicts — MSI Afterburner, RivaTuner, and Discord overlay can cause UI freezes
- If nothing helps, back up
%appdata%\Playnite\libraryand perform a clean reinstall
Pro tip: Add --nolibupdate to your Playnite shortcut to skip automatic library refresh on startup. This fixes the ~20% startup crash rate some users report when multiple library plugins attempt to authenticate simultaneously.
Check our system requirements to verify your PC meets the hardware specs.
Why is Playnite running slow and how to speed it up?
Playnite slowness usually comes from too many active plugins, high-resolution background images, or running on a mechanical hard drive. Most performance issues are fixable with a few settings changes.
With 10+ active plugins, startup time can balloon from 3 seconds to 30+ seconds because each plugin authenticates with its respective game service. Libraries with 1,000+ games using full-resolution background art can push RAM usage past 1 GB. Users on HDDs report especially long load times compared to SSDs, where Playnite typically starts in under 5 seconds with a moderate library.
- Disable plugins you don’t actively use: Add-ons > Installed > uncheck unnecessary ones
- Reduce image quality: Settings > Appearance > set background image blur/resolution to lower values
- Switch to a lightweight theme like Default or Starter instead of resource-heavy themes like Helium
- Move Playnite from HDD to SSD — portable mode makes this a simple folder copy
- Disable playtime import from plugins you don’t need tracking for
Pro tip: The biggest performance win is disabling the Success Story and Extra Metadata plugins if you don’t use achievement tracking. These two plugins account for the majority of startup and UI lag reports on r/playnite.
Verify your hardware meets our recommended specifications for the best experience.
Playnite stopped working after a Windows update – how to fix?
Windows updates occasionally break Playnite by updating .NET Framework components, resetting file associations, or changing GPU driver behavior. The fix depends on the specific symptom.
After the Windows 11 24H2 update, multiple users reported Playnite auto-enabling HDR when launching games and UI rendering glitches. The 23H2 update caused some library authentication tokens to expire, forcing re-authentication for Battle.net and GOG. Windows 10 22H2 introduced a .NET 4.8.1 update that temporarily broke some Playnite extensions using older APIs.
- Start Playnite in Safe Mode (
--safestartup) to rule out extension conflicts triggered by the update - Re-authenticate your game libraries: Settings > Libraries > click Authenticate for each disconnected service
- Update GPU drivers (NVIDIA/AMD) — Windows updates often reset or conflict with older driver versions
- Run Playnite as Administrator temporarily to see if the update changed file permissions
- Check Playnite’s crash log at
%appdata%\Playnite\playnite.logfor specific error messages
Pro tip: Before major Windows updates, export your Playnite library via Main menu > Library > Backup. This creates a ZIP of your entire database, settings, and metadata that you can restore if anything breaks.
If the issue persists, try a fresh install from our download section while keeping your backup.
How to update Playnite to the latest version?
Playnite checks for updates automatically on startup and shows a notification banner when a new version is available. Click the banner to download and install the update in-place without losing your library or settings.
The current version is 10.51, released February 20, 2026. Standard installations receive automatic update prompts. Portable installations also check for updates but require you to confirm the download location. Updates are incremental when possible, meaning you download only changed files rather than the full 50 MB installer. Your game library, playtime data, themes, and plugin configurations survive updates — only the core application files are replaced.
- Open Playnite and look for the yellow update banner at the top of the window
- Or manually check: Main menu > Help > Check for Updates
- Click “Download and Install” and wait 15-30 seconds
- Playnite restarts automatically with the new version
Pro tip: After updating Playnite, also update your plugins: Add-ons > Updates tab > Update All. Plugin compatibility issues after a Playnite update are the number one cause of post-update crashes.
Download the latest version directly from our download section.
What is new in the latest version of Playnite?
Playnite 10.51, released February 20, 2026, is the latest stable version. It includes performance improvements, updated library plugins, and bug fixes for the fullscreen mode controller navigation.
The 10.x series has focused on stability and polish after the major 10.0 release that introduced the revamped addon system, improved metadata downloading, and better multi-monitor support. Version 10.51 specifically addressed memory leaks during extended sessions, improved the game import speed for Steam libraries with 1,000+ titles, and fixed a long-standing bug where playtime tracking occasionally counted background time incorrectly.
- Performance: reduced memory usage by ~15% for large libraries
- Fullscreen mode: fixed controller deadzone issues and improved theme compatibility
- Library: faster Steam and Epic imports, fixed GOG authentication expiring prematurely
- Coming next: Playnite 11 with Avalonia UI, bringing Linux support and a modernized rendering engine
Pro tip: Want to test upcoming features? Enable the beta channel in Settings > General > Check for Beta Updates. Beta builds are stable enough for daily use but may have minor UI quirks with certain themes.
Get the latest release from our download section.
Playnite vs LaunchBox vs GOG Galaxy – which game library manager is better?
Playnite is the best all-around choice for most PC gamers. It offers the widest library integration (44+ plugins), free fullscreen mode, and the most active community. LaunchBox is better for retro game emulation, and GOG Galaxy works well as a simple unifier for casual users.
Playnite supports Steam, Epic, GOG, EA App, Battle.net, Ubisoft Connect, Xbox PC, itch.io, Amazon Games, Humble, and dozens more through community plugins. LaunchBox officially supports only 4 storefronts but has excellent metadata scraping for retro consoles and ROMs. GOG Galaxy integrates around 20 platforms but many connectors are community-maintained and frequently break. On price, Playnite and GOG Galaxy are completely free. LaunchBox is free at the basic level but locks its BigBox fullscreen mode behind a $30 lifetime license or $75 premium tier.
- Playnite: best for PC gamers wanting a free, highly customizable unified library with controller-friendly fullscreen
- LaunchBox: best for retro/emulation enthusiasts willing to pay for BigBox’s video snaps and metadata
- GOG Galaxy: best for users who just want a simple library view without heavy customization
- Performance: Playnite is the fastest of the three. LaunchBox can be slow with large libraries. GOG Galaxy sits in the middle.
Pro tip: Playnite’s official site has a detailed comparison table at their documentation page that breaks down every feature difference. Check it before deciding.
Try Playnite yourself — grab it from our download section.
How do I set up emulators and ROMs in Playnite?
Playnite supports emulator integration through its built-in emulator manager. You can add emulators like RetroArch, Dolphin, PCSX2, RPCS3, and Cemu, then scan your ROM folders to import games directly into your unified library.
The emulator setup lives under Main menu > Library > Configure Emulators. Here you add emulator profiles, specifying the executable path, launch arguments, and supported file extensions. Once profiles are configured, Playnite can scan ROM directories and automatically match files to the correct emulator based on file extension and platform metadata. Imported emulated games appear alongside your Steam, Epic, and GOG titles with full cover art, metadata, and playtime tracking.
- Go to Main menu > Library > Configure Emulators > Add
- Select your emulator from the auto-detection list or configure it manually
- Set the emulator path, default arguments (e.g.,
-ffor fullscreen), and supported platforms - Go to Main menu > Add Games > Scan With Emulators
- Point to your ROM folder, select the emulator profile, and import
- Playnite downloads cover art and metadata automatically for recognized titles
Pro tip: RetroArch is the most compatible emulator for Playnite since a single RetroArch install can handle dozens of retro platforms through cores. Configure one RetroArch profile with multiple platform entries rather than adding separate emulators for each console.
Get started with emulator setup in our getting started guide.
What are the best Playnite plugins and themes to install?
The most popular Playnite plugins are SteamGridDB (custom artwork), HowLongToBeat (completion time estimates), Success Story (achievement tracking), and Extra Metadata (videos, logos, descriptions). For themes, community favorites include Helium, Starter XL, and the PS5-inspired DashX theme.
Playnite’s addon browser (accessible via Main menu > Add-ons > Browse) hosts over 300 community-created extensions. Plugins extend functionality in ways the base application does not cover. SteamGridDB lets you replace game cover art and backgrounds with community-curated images. HowLongToBeat pulls estimated completion times from the HLTB database. Duplicate Hider merges entries when the same game appears in multiple store libraries. Theme-wise, Helium is the most downloaded desktop theme with a clean, minimal look, while DashX transforms fullscreen mode into something resembling the PS5 home screen.
- SteamGridDB: custom cover art, backgrounds, logos, and icons
- HowLongToBeat: shows estimated play time on game detail pages
- Success Story: unified achievement view across all platforms
- Duplicate Hider: merges identical games from different stores
- Themes: Helium (clean desktop), DashX (PS5-style fullscreen), Starter XL (minimal)
Pro tip: Don’t install more than 10-15 plugins at once. Each active plugin adds to startup time and RAM usage. Start with 3-4 that matter most to you and add more gradually.
See all available features and customization options in our features section.
Still have questions? Visit the official Playnite documentation or the r/playnite community on Reddit. Ready to try it? Download Playnite and get started today.